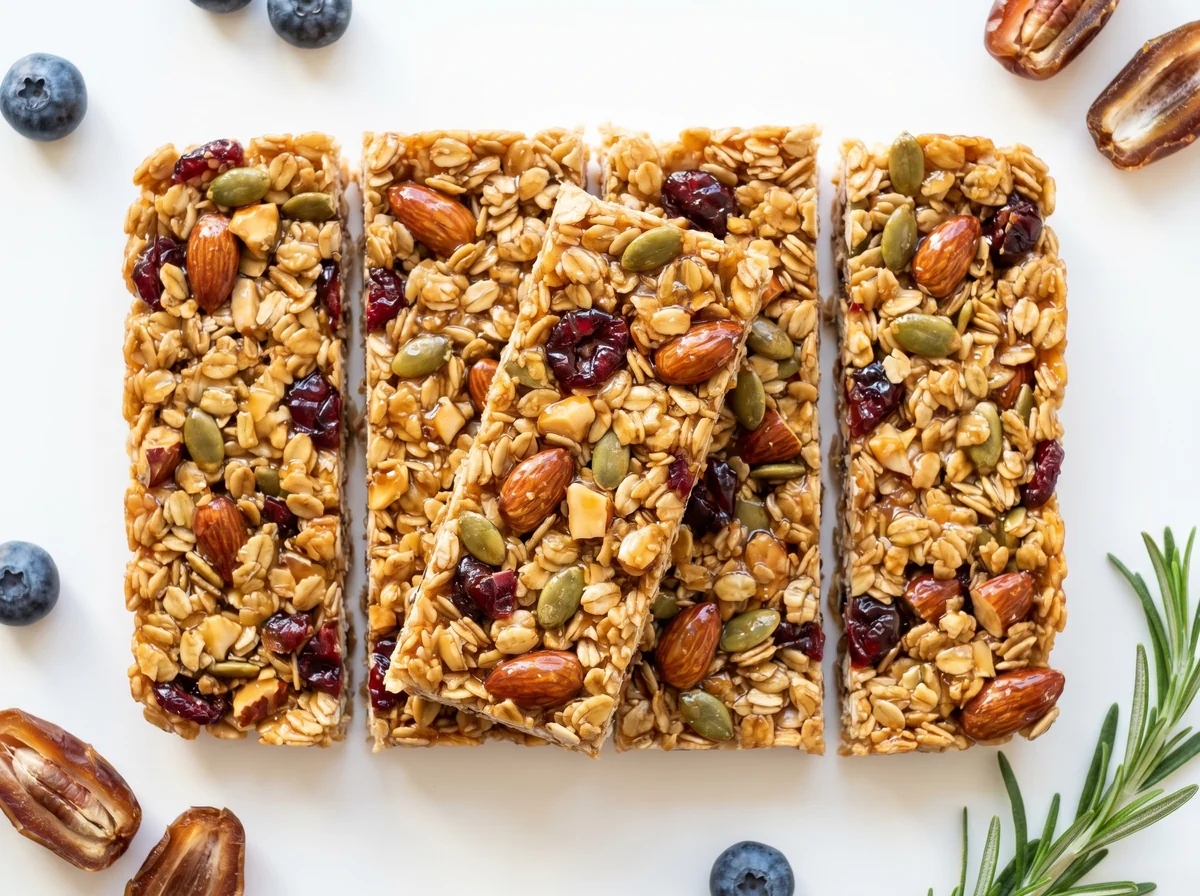
Granola bars have become the go-to snack for school bags, work bags, and gym kits — yet most on store shelves are packed with refined sugar, glucose syrup, and stabilizers you cannot even name. The idea here is simple and old: rebuild the bar in your kitchen from real oats, seeds, and nuts, bound with nut butter and honey instead of manufactured sugar.
The difference between these bars and the loose granola we are used to is not in the ingredients but in the pan and texture: we press the mixture and chill it until it becomes a firm slab that can be cut and carried in a pocket without crumbling. Prepare a batch on Friday and it will keep you stocked with reliable snacks all week.
Preparation Steps
Toast the oats and nuts
Spread the oats, almonds, sunflower seeds, and pumpkin seeds on a baking tray and toast in a preheated oven at 160°C for 8 to 10 minutes until a nutty aroma develops and the color turns light golden. Light toasting drives off moisture and deepens flavor, making the bars crispier and longer-lasting.
Prepare the pan
Line a 20 cm square pan with parchment paper, leaving overhang on two sides for easy lifting later. A well-lined pan prevents sticking and lets you remove the entire slab intact.
Melt the binder
Place the almond butter, honey, and coconut oil in a small saucepan over low heat and stir for two to three minutes until the mixture is smooth, uniform, and glossy without boiling. Boiling breaks the honey's binding properties and makes the bars crumbly — just melt it.
Add flavor
Remove from heat and stir in the vanilla, cinnamon, and a pinch of salt until evenly distributed. Adding vanilla away from the heat preserves its aroma, since high heat evaporates its volatile compounds.
Mix the dry ingredients
In a large bowl, combine the toasted oats and nuts with the ground flaxseeds, shredded coconut, and chopped dates, stirring until the seeds and dates are evenly distributed. Even distribution ensures each bar holds together and has consistent flavor.
Combine wet and dry
Pour the warm honey mixture over the dry ingredients and stir vigorously for one to two minutes until every oat is coated and everything sticks together. The sign of success is that the mixture clumps together when pressed with the back of a spoon.
Press into the pan
Transfer the mixture to the lined pan and press it down firmly and evenly with the back of a spoon or the flat bottom of a glass until it forms a compact, dense layer. Firm pressing is the secret to bars that hold together — a well-compacted layer will not crumble when cut.
Chill
Refrigerate for at least one full hour until the slab is completely firm and cold. Chilling solidifies the coconut oil and honey, turning the soft mixture into a firm slab that cuts cleanly.
Cut and store
Lift the slab from the pan using the parchment overhang onto a board and cut into twelve bars with a sharp knife. Wipe the knife between cuts for clean edges, and store the bars in an airtight container. A fully chilled slab gives straight cuts without crumbling.
Blood Sugar Impact
The glycemic index (GI) measures how quickly a food raises blood sugar, while the glycemic load (GL) measures how much a full serving raises it. Together they give the complete picture.
Glycemic Index
GI
51Low
Low0–55Medium56–69High70+
A low value (≤55) means a gradual rise in blood sugar — the most suitable range for diabetes and insulin resistance.
Glycemic Load
GL
11Medium
Low0–10Medium11–19High20+
Glycemic load reflects the impact of the full serving. To lower it: take half a serving, or pair the recipe with a source of protein and fiber.
Nutritional Information
Per ServingMakes 12 servings · one serving is about 60 g of raw ingredients
Calories280 kcal14%of Daily Value*
Protein8 g16%of Daily Value*
Carbohydrates26 g9%of Daily Value*
Fat17 g22%of Daily Value*
Fiber5 g18%of Daily Value*
Sodium304 mg13%of Daily Value*
* Percent Daily Values are based on a 2,000-calorie diet per FDA food-label reference values — your daily needs may be higher or lower. Values are derived from the recipe's ingredients via the USDA database.
Troubleshooting
The most common problems when preparing Homemade Oat and Honey Granola Bars, and how to fix them:
Bars crumble when cut
Usually the pressing was too weak or cutting happened before full chilling. Re-press any soft mixture more firmly, chill for a full hour at minimum, and cut with a sharp knife while the slab is cold.
Mixture is dry and does not hold together
The binder-to-dry ratio is off. Add an extra tablespoon of nut butter or 15 g of honey and stir until the mixture clumps when pressed with the back of a spoon.
Bars are soft and sticky, never firm up
Either the honey mixture boiled and broke down its binding, or the refrigerator was not enough time. Next time, melt the binder without boiling it, and give the pan more time in the refrigerator or 15 minutes in the freezer.
Slight bitter taste after toasting
Seeds and nuts were slightly over-toasted. Lower the oven to 150°C and watch the color — the target is light golden, not dark brown. Stir the tray halfway through toasting.
Bars stick to the parchment
Coconut oil set without releasing from the paper. Leave the slab at room temperature for two minutes before peeling, or lightly brush the parchment with coconut oil before pressing.
Storage and Make-Ahead
Room temperature
In an airtight container away from heat and humidity, they stay firm for about five days. In warm weather coconut oil softens, so the refrigerator is safer in summer.
Refrigerator
In an airtight container they last about two weeks and stay firmer and crispier. Separate layers with parchment to prevent sticking.
Freezer
Individually wrapped, then in a sealed bag, they keep for about three months. Remove a bar to the refrigerator overnight or leave it on the counter for ten minutes before eating.
Tested Ingredient Substitutions
Original Ingredient
Tested Substitute
Ratio
Flavor Difference
Honey
Date molasses or maple syrup
1:1 by volume
Both are sticky binders that work like honey. Date molasses has a deeper flavor and is better for those avoiding honey — the sugar content remains high.
Almond butter
Peanut butter or tahini
1:1 by weight
tahini is a tree-nut-free alternative but adds sesame (an allergen). Peanut butter is cheaper and more widely available.
Chopped almonds
Chopped walnuts, pistachios, or cashews
1:1 by weight
Any toasted tree nut works. Choose unsalted to control sodium, and chop coarsely for crunch.
Coconut oil
Grass-fed butter or neutral vegetable oil
1:1 by volume
Coconut oil solidifies when chilled, strengthening the bind; substitutes give slightly softer bars — increase chilling time.
Chopped dates
Raisins, dried cranberries, or chopped dried apricots
1:1 by weight
Any dried fruit adds sweetness and stickiness. Choose unsweetened varieties to keep the glycemic load lower.
How Much Does It Make? Scaling Guide
Amount
Oats
Nut butter
Honey
Mold
Half recipe (6 bars)
100 g
60 g
50 g
mold 15 cm
Full recipe (12 bars)
200 g
120 g
100 g
mold 20 cm
Double the recipe (24 bars)
400 g
240 g
200 g
tray 23×33 cm
EEINA Nutrition Tip
The biggest reason bars crumble is weak pressing and cutting before they are fully chilled. Press the layer with real force until it is compacted, and give it a full hour in the refrigerator before the knife. And if you want to lower the glycemic load slightly, reduce the honey to 80 g and compensate for binding by adding five more grams of chopped dates — date fiber adds natural stickiness.
Add This Recipe to Your Plan
The EEINA app saves your favorite recipes, calculates them from their real ingredients, and shows your daily numbers toward your goal. Try it free now.
Not tagged for diabetics. Honey and dates raise the glycemic load despite the fiber content, so they are not suitable as a therapeutic tag for diabetics without careful calculation and medical supervision. For those managing blood sugar, reduce the honey and increase the seeds, with guidance from a dietitian.
What is the difference between these and regular granola?
Granola is loose and eaten by the spoonful or with milk. These are pressed and chilled into a firm slab that is cut and carried in a pocket without crumbling. The difference is in the pan and texture, not essentially in the ingredients.
Can I make them without an oven?
Yes. Skip the toasting step and use raw oats and nuts — but toasting deepens flavor and extends shelf life. Or toast the oats and nuts in a dry skillet over low heat with constant stirring until golden.
Is honey necessary or just a sweetener?
Honey here is both a binder and a sweetener — its stickiness is part of what holds the bar together. It can be replaced with date molasses or maple syrup at the same volume, but cannot be omitted without a sticky substitute, otherwise the bars crumble.
Are they suitable for children's school bags?
Yes, a practical school snack. Confirm your child's school does not have a nut-free policy — if it does, replace the almond butter and nuts with sunflower seeds and sunflower seed butter for a nut-free version.